techsnapshots

Stay hungry Stay foolish….

Archive for the ‘Uncategorized’ Category

Manual Relying Party trust on ADFS V3

Posted by techsnapshots on September 16, 2015


How to configure Manual Relying Party or Service provider trust on ADFS side. Here ADFS is acting as Identity provider.

Open the ADFS V3 Snap-in


p1

Right click on Relying Party Trusts and select relying party manually.

p2


Provide a display name and notes if required.

p3


p4


Certificates are already installed with the initial ADFS setup. click next

p5


Click enable the support of SAML.

p6

Provide the Relying Party or SP trust identifier link and Add.

p7


p8


Permit all the users and click next and Finish

p9

Cross check identifier link is visible

p10


Provide SP Endpoint Type

p11


Add Claims. Here Attribute store is Active Directory.

p14

and if you include Name ID as claim . you need to customize the claim rule. click edit rule and provide the following value in below custom rule box.

c:[Type == “http://schemas.microsoft.com/ws/2008/06/identity/claims/windowsaccountname”%5D
=> issue(Type = “http://schemas.xmlsoap.org/ws/2005/05/identity/claims/nameidentifier”, Issuer = c.Issuer, OriginalIssuer = c.OriginalIssuer, Value = c.Value, ValueType = c.ValueType, Properties[“http://schemas.xmlsoap.org/ws/2005/05/identity/claimproperties/format”%5D = “urn:oasis:names:tc:SAML:2.0:nameid-format:persistent”);

p16

Check the  ADFS trust working by your idpinitatedsignon link as shown below replacing “yourcorpsite” with the name of your ADFS corp site

https://sts.yourcorpsite.com/adfs/ls/IdpInitiatedSignon.aspx

p15

Please comment if you find this post helpful or any suggestions.

Thank you!

Posted in Uncategorized | Tagged: , , | Leave a Comment »

IDP for SAP CE 7.2 on ADFS V3

Posted by techsnapshots on June 18, 2014


Here we will see how to configure IDP for SAP CE 7.2 on ADFS V3

Get the Metadata.xml from SAP CE and store it.

 Open Primary ADFS server


 Import manually the SAP CE metadata xml file

If you get any Warning while importing the SAP CE metadata , ignore it.

 Click Next

SHA-256 is default hash algorithm of ADFS. You can change the SignastureAlgorithm to SHA-1 on ADFS. I was not able to change it to SHA-1 while configuring SAP CE 7.2 Relying Party Trust. However we can change this later. So, I believe this is a bug here.

 Edit the claim rule.


Provide a Claim rule name and claim value

After Finish you can select the Properties and change the hash algorithm to SHA-1

 Provide the ADFS metadata to SAP

 Example:

 https://sts.yourcompany.com/FederationMetadata/2007-06/FederationMetadata.xml

 on ADFS server , if you get below data , it is not metadata, try it from another machine as shown below.


 On different machine.

On Firefox.

Two thing you need to configure SP on SAP CE. ADFS Metadata.xml and Token-signing certificate.

Right click the Token-Signing certificate – >detail -> Copy to file and export the certificate.

 copy cert

 Check the federation

https://sts.yourcompany.com/adfs/ls/idpinitiatedsignon

Posted in Uncategorized | 1 Comment »

Part 5: Recover Files and Folders Using the Microsoft Online Backup Service Agent

Posted by techsnapshots on August 7, 2012


Recover Files and Folders Using the Microsoft Online Backup Service Agent

Exercise1: Recovering files and folder using the Microsoft online backup service agent.

1. Open My Computer pinned in taskbar. Go to the C Drive and delete the Filesrv1

2. Press the Windows logo key + Q to open the Apps menu, and then click Microsoft Online Backup Service Agent.

3. In the Action menu, click Recover Data to open the Recover Data Wizard. The Getting Started page is displayed. Click This Server, and then click Next to continue.

4. The Select Recovery Mode page is displayed.

5. Choose Browse for files and Click Next to continue.

6. On the Select Volume and Date page is displayed.

Select the C: \ from drop down menu and select the date and time.

Click Next to continue.

7. On the Select items to recover page is displayed. Expend the server and navigate and select Filesrv1 Click Next to continue.

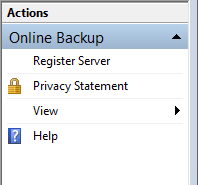
8. On the Specify recovery options page is displayed.

Choose – Overwrite the existing versions with the recovered versions

In Security settings, select the check box to restore the access control list (ACL) settings of the files and folders that are recovered


Info: – Create copies so that you have both versions This option makes a copy of the file with a new file name in the same location as the duplicate file. The file name of the new file starts with the following text string (<recovery date>Copy of<original file name>)

Overwrite the existing versions with the recovered versions This option overwrites the file, and the only version that will exist in the restore location is the recovered file version.

Do not recover the items that already exist on the recovery destination This option retains the current version of any files that already exist in the recovery destination. Recovery will occur only for data that does not exist in the recovery destination.

Note: – Sharing settings are not recoverable.

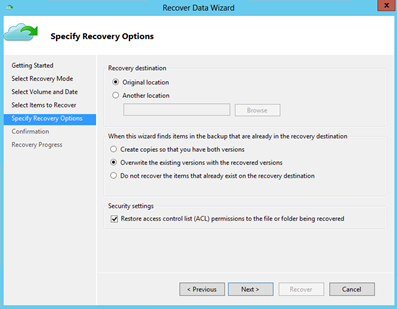
9. On the Confirmation page is displayed and Click Recover tab to start the recovery process.


The Recovery Progress page is displayed, which shows the progress of the recovery operation.

10. The Jobs pane shows the status of Job completed when the recovery is done.

11. Check on your C Drive , Filesrv1 restored or not.


Recovering files and folder using PowerShell ISE

You can recover data that was backed up with Microsoft Online Backup Service onto any server running Windows Server 2012 that is connected to the Internet. This can be useful for disaster recovery situations where you are not able to get physical or network access to your servers.

1. Open My Computer, go to the C: drive and delete the Filesrv2.

2. Open PowerShell ISE and run the following commands:

3. Set the variables

$source = Get-OBRecoverableSource

$item = Get-OBRecoverableItem -Source $source[0]

$FinalItem = Get-OBRecoverableItem -ParentItem $item[0]

$recover_option = New-OBRecoveryOption


Run the command to recover data


3. Check your C: drive for restored.


Note: Folder that you recovering is defined on $FinalItem and $finalitem pickup up inputs from $filespec that you have defined while scheduling the backup on exercise part 4.

Posted in Uncategorized | Leave a Comment »

Part4: Schedule Backups using the Microsoft Online Backup Services with PowerShell ISE.

Posted by techsnapshots on August 7, 2012


Schedule Backups using the Microsoft Online Backup Services with PowerShell ISE.

Note: You will the find the commands in Schedule file placed on your desktop

1. Create the Backup Policy to schedule the backup from PowerShell ISE

Here you will be creating variables for Backup Policy:

a. Backup policy name

b. File to be back up

c. Days and time to schedule the backup

d. Backup retention days

$policy = New-OBPolicy

$filespec = New-OBFileSpec -FileSpec “c:\Filesrv2”

$sched = New-OBSchedule -DaysofWeek <days of week> -TimesofDay <00:00>


$ret = New-OBRetentionPolicy -RetentionDays 7


Example:


2. Run the following commands to set the Backup Policy on Powershell ISE:

Add-OBFileSpec -Policy $policy -FileSpec $filespec

Set-OBSchedule -policy $policy -schedule $sched

Set-OBRetentionPolicy -Policy $policy -RetentionPolicy $ret

$ret = New-OBRetentionPolicy -RetentionDays 7


Click Yes when prompted.

The Policy automatically run to take backup on Scheduled time.


Posted in Uncategorized | 1 Comment »

Part 3 : Installing Configuring and Managing Microsoft Online Backup Solution with Windows PowerShell ISE

Posted by techsnapshots on August 7, 2012


Installing Configuring and Managing Microsoft Online Backup Solution with Windows PowerShell ISE


Install the Microsoft Online Backup service agent.


1. Login to the server2 and open IE Explorer and on Address bar type

http://connect.microsoft.com/site1277

2. Click Download and choose Online Backup Service Installer

3. Download the OBSInstaller.exe and save the file on your desktop .

Open Windows Powershell ISE 64 bit from taskbar.


4. Change directory to the Obsinstaller folder.

PS C:\users\Administrator> cd .\Desktop\OBSInstaller


PS C:\users\Administrator\Desktop\OBSInstaller>


5. Install OBSInstaller .exe agent quiet mode.

Note: press spacebar after /q and then Enter Key

PS C:\Users\Administrator\desktop\OBSInstaller> .\OBSInstaller.exe
/q


6. Wait for some time to appear Microsoft Online Backup Solution icon on the desktop. Agent has installed successfully.


: Registering the server2 with Microsoft Online Backup Solution

Note: You will find the commands in Register file placed on your desktop

Set the following variables and start the registration:

User your online user ID and password.

Below is only example :-

1. Microsoft Online Backup service Password: P@ssword1

2. Microsoft Online Backup service User ID: reglive@onlinebackupservice.onmicrosoft.com

3. Register the server

$pwd = ConvertTo-SecureString -String “P@ssword1” -AsPlainText –Force

$cred = New-Object –TypeName System.Management.Automation.PsCredential –ArgumentList “reglive@onlinebackupservice.onmicrosoft.com”, $pwd

Start-OBRegistration -Credential $cred


You will find the server2 is registered successfully

2. How to set the Passphrase .Passphrase require at the time of restoration of backup to alternate location.

set-OBMachinesSetting

On prompt type:

Server2-corpbackupserver and click OK.


Posted in Uncategorized | 1 Comment »

Part: -2 Schedule Backup using the Microsoft Online Backup Services.

Posted by techsnapshots on August 7, 2012


The backup schedule is the core of the backup process. It identifies which files and folders to backup and the days and time to perform the backup

1. In the Action menu, click Schedule Backup to open the Schedule Backup Wizard. The Getting Started page is displayed. Click Next to continue.

2. On the Getting started page review the file and folder backup options available and click Next

3. On the Select items to backup page. Click Add Items.


Expend the C :\ and navigate and Check Filesrv1 folder
from tree view of the file
system and click OK .


4. On the Specify backup time page is displayed.

Select the day/days of the week and time that backups will occur. Click Next to continue.


5. On the Specify retention settings page. From Drop down – select 7 days. Click Next to continue.

The Confirmation page is displayed. Click Finish to create the schedule.

6. On the Summary page is displayed with a message that the online backup schedule was successfully created. You can now close the wizard.

After you configure a schedule, details for the backup schedule are displayed in the Microsoft Online Backup Service snap-in as shown below.


Posted in Uncategorized | Leave a Comment »

Microsoft Online Backup Service for Windows Server 2012 -part 1

Posted by techsnapshots on June 2, 2012


The Microsoft Online Backup Service is a new feature for Windows Server 2012 that seamlessly enables off-site file and folder backups from the on-premise server.

On opting the technology an organization can have key benefits of recover data in case of disasters (server destroyed/stolen, disk crash) and data loss scenarios such as data accidentally deleted, volume deleted, and viruses. This technology leveraging the Small Business Segments to have Low-cost backup & recovery solution for single server backups. It also serves as low-cost backup alternative for departments in mid to large sized organizations. Moreover, it’s also helpful when you think for remote office backup and recovery consolidation.

let’s see how we can configure this.

Register your windows Live account on :-


https://connect.microsoft.com/site1277/Survey/MandatorySurveys.aspx

Sign Up for the Microsoft Online Backup Service and Install the Microsoft Online Backup Service Agent

You will get new Microsoftonline ID and password on your live account.

login to your Windows 2012 Beta or RC server and download the Online Backup service installer from following link .http://connect.microsoft.com/site1277/Downloads.

download the OBSInsatter and run it.

Image

Image

Image

make sure you hve 2.5 GB of free space for cache.

Image

MOBS agent has been success fully installed on the Windows server 2012 RC

Image

You will find the Console and cmdlet for MOBS on Start Screen. You will find same console on Computer Management Snap-in.

Image

After scucces installation of OBSInstaller agent. you need to register the server on Microsoft Online Backup Service with you Microsoftonline ID. 

Image

user the microsoft online ID that is provided to you.

Image

Configure Proxy if you have any

Image

you can put your own passphrase also – remember this is very important key . Apply and copy to clipboard and save that on notepad and keep that on safe place.

Image

Image

Server is registered and ready to backup.

Image

Thought of  the day…

Leonardo da Vinci – “Simplicity is the ultimate sophistication.”

*********************************************************************************************************************

Posted in Uncategorized | 1 Comment »

FGPP at Windows 8 server

Posted by techsnapshots on April 6, 2012


 Windows 8 server significantly cut short FGPP configuration. Now it is more simple and quick. 

Image

this is the default password policy for the domain 

Image

Go to the Active Directory Administrative Center. and highlight the domain (here Contoso is highlighted ) in the Middle pane it shows the Folders with Type in that choose Password Settings container and on right Task Pane it shows the action items. 

Image

From right pane Tasks item choose new- > Password settings 

Image

Provide a name and selects the options that suits your requirements . for  example ,  here i have chosen  the password length minimum 5 char  and modified some other settings with new values.  further below put Rita Simon as my trarget object. target object will be only users or Group

Image

FGPP is configured. The Precedence is 1. its mean, it has higher priority. the user and group objects may have multiple FGPP with precedence value. lower the precedence , higher the value it has. 

Image

the user login and try to change her password maintaining the minimum length of 5 character .

Image

the user is able to log in with her new and short password configured with FGPP. 

FGPP in window server 2008 

Posted in Uncategorized | 5 Comments »

no DCpromo on windows 8 server beta

Posted by techsnapshots on April 5, 2012


Its surprising that window 8 server has no DCpromo command which we are habitual of using while promoting DC since decade… i am going to miss that cute little pen write and rubbing on the server. anyways, here are the snapshots of how to configure windows 8 beta to a Domain controller. 

Image

this is the prompt when you try to run DCpromo 

Image

Image

Image

Image

Image

Image

click Promote this server to a domain controller. 

Image

Image

click Next

 Image

Image

Image

Image

I like the the Flag on the top right corner. This display errors and some pending tasks

aImage

The DC is ready now… 🙂 


Posted in Uncategorized | Leave a Comment »

convert the CDA into MP3 with windows media player

Posted by techsnapshots on April 2, 2012


ImageImage


Posted in Uncategorized | Leave a Comment »